Saturday, August 28, 2010

It's All About the Sky!


Seaside Villa
Watercolor 11" x 15" Mats to 16" x 20"

In my painting above, Seaside Villa, the emphasis is on the sky! In this painting, it appears that sunlight is trying to break through a gap in the heavy clouds illuminating the little cluster of buildings on the cliff top. Notice how the color of the sky differs on the right and left sides of the painting helping to create the storm clouds and imply ilumination behind the clouds.


Watercolor tip: How to paint the sky
Mix your sky washes before you being to paint. You will be working wet on wet so that the colors will flow and mix easily together.

I used the following colors for the sky: cadmium red, cobalt blue, a mix of these two colors, Paynes gray, and sepia.

Use a large round brush to paint in the sky.

Place your first wash of a diluted cadmium red in the lower sky.

Drop in some colbalt blue at the top of the sky, leaving some of the paper white.

Add a mix of the two colors and paint in cloud shapes wet in wet on the left and right side of the paper.

Use the point of the brush to paint in smaller clouds lower down.

Paint dark clouds using Payne's gray to create a stormy look on the lower part of the sky behind the buildings. Drop in a little sepia.

Spray a mist of water on the sky if it is getting too dry to work well.

Lift some areas of white shaping the clouds using a tissue.


Clouds can be an interesting part of a painting.....sometimes the painting is really all about the sky!

Happy Painting!
Karen

Saturday, August 21, 2010

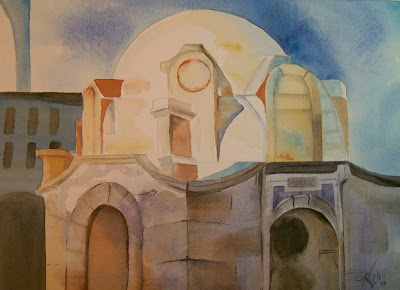
The Dome

The Dome
Watercolor 9" x 12" Mats to 14" x 16"

My watercolor above titled, The Dome, is an excellent example of layering wash upon wash to build up color.  The painting above was executed by laying in thinned washes of uniform and varied tones, applying color wet-in-wet, and overlaying washes onto dry colors to build up deep tones and color.  The broad area of shadow is not painted in one tone of a single color, but created using wet-in-wet technique.  Different colors are added to a wet or damp area and allowed to mingle and fuse.  This will allow for some interesting colors and results. 

Note:  The whitest area of the dome was left unpainted allowing for the greatest contrast of light and shadow. 

Watercolor tip:
Working successfully with wet-in-wet techniques relies on a balance between control and spontaneity.  Limit the effect of the technique by wetting only specific areas of color or tone, such as the side of a column shadow, as shown in the painting above.  By dealing with separate areas in this way your paint will move freely within those areas only, but will not run out of control over the work as a whole.

Happy Painting!
Karen

Saturday, August 14, 2010

Poppy Splash!

Poppy Splash
Watercolor 11" x 15" Mats to 16" x 20"

The watercolor painting above, Poppy Splash, was painted using a fun technique.  The painting composition was not drawn on the paper before I started painting.  I wet the paper and flooded in the colors for the flowers and the foliage.  I tipped the drawing board while the paint was still very wet and allowed the colors to merge and blend and then allowed them to dry to see how they settled on the paper.   I drew my composition on top of the wash.  The shape of the flower does not have to take up the entire area of color.  This painting is intended as an abstraction and the colors of the flowers, greenery, etc. may be "outside" the lines of those shapes.  The extra paint will indicate a "blurred" flower or leaf in the background.    Paint was then applied on top of the initial wash and deepened in some areas and lifted in others. 

Try a different approach like this one and see how much fun it can be!

Happy Painting!
Karen

Saturday, August 7, 2010

Doors and Windows


Doors and Windows
Watercolor 9" x 12" Mats to 14" x 16"

Interesting doors and windows have always been a favorite subject of mine for paintings.  The watercolor above incorporates both in this simple arrangement.  From barn doors to European doors, one can always find something interesting to put on paper and give the viewer the desire to wonder what interesting things or people might be found inside. 

Watercolor tip:
This watercolor uses a resist to add texture to the stone wall, around the window and the door on the right.  I used oil pastels applied to the watercolor paper prior to painting. 

A resist is defined as a method of preventing paint from coming into contact with the paper, or other paint layers, by interposing a paint-resistant coating, such as wax.  This is often used to preserve highlights, or for specific textural effects. 

If you have not tried using a resist, give it a try.  You do not have to use oil pastels, plain old "Crayola" crayons will work as well!

Happy Painting
Karen